
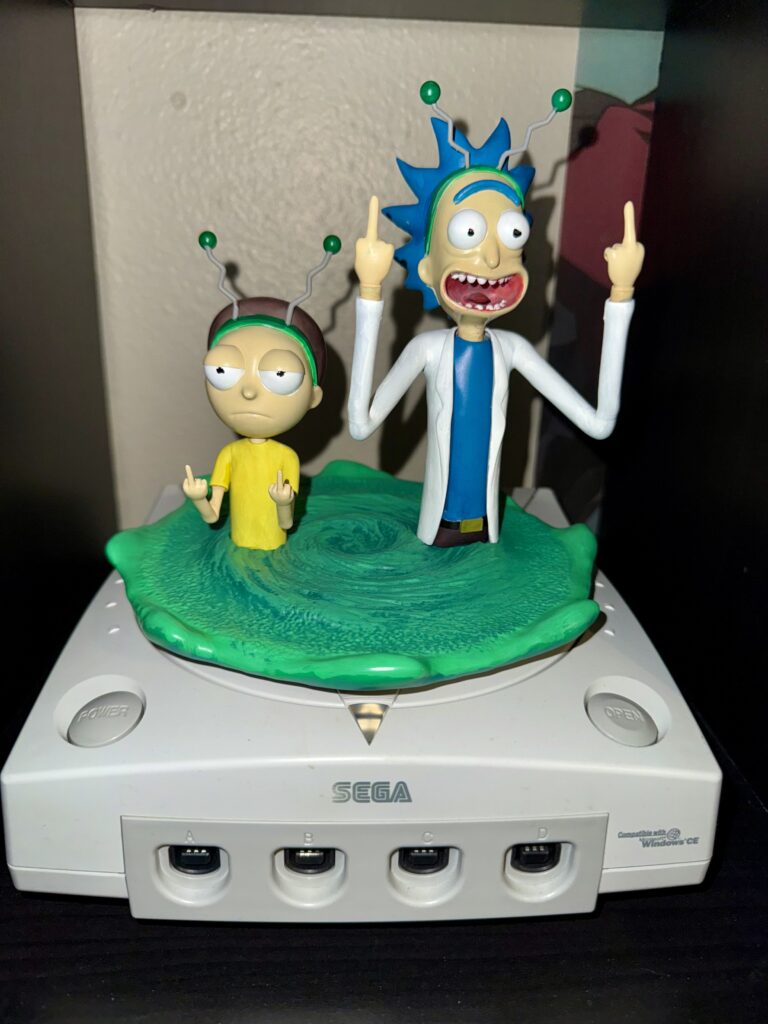
I decided to do a statue from Rick and Morty. I subscribe to the Lychee Library. They have a lot of really cool statues for downloading, and this was one of them. Rick and Morty is one of the most irreverent shows I have ever seen. Sometimes I think that’s important. I think sometimes, when you’re going through a lot of S#^$, you just need something to shock you. This fact has made this one of my favorite shows. I will give you a shot of the finished product, and then I will talk a bit about the issues I had and how I got to the final product.

Printing
This was printed on an Elegoo Saturn 4 Ultra in Anycubic Standard resin. Printing was really easy. I had to do it in two batches since I could not fit everything onto one plate. The really awesome thing about the Lychee Library is that there is nothing to really do. The parts are already laid out, hollowed, and supported. You just arrange it depending on the size of your build area and hit print. I will be printing a lot more from there.
Prep
I did have to do a little sanding. Resin printing always has a bit of work to remove support scaring, but it was really not bad. It’s a lot less sanding than FDM, which is one of the reasons I wanted to get a resin printer. I primed it in gray with Army Painter primer. It’s been my go-to since it goes in an airbrush with no thinning, just fill and spray. After letting it dry, there was really nothing else to do but start painting.
Painting
This section is where I did a trial of a new paint. So, for my last few builds, I was using an acrylic paint from Walmart called Folkart. It was fine, but I had a hard time thinning it just right for my airbrush. I had tried a Createx paint that was supposed to just airbrush but I didn’t like the finish and just didn’t like how it sprayed.
I know that I could learn how to thin properly, but I have a busy life, and I hate wasting time and paint trying to get things just right. On this build, I went with Golden High Flow. I got a starter set on Amazon, and it worked great. High flow is more like ink than paint. It sprayed without any thinning and brushed easily enough. Now, on the brush side, there was a learning curve. Since it was so much thinner, it took a lot of coats to get even coverage, and I also really had to watch my brush stroke for speed and pressure not to leave brush marks. But this is what I wanted. Something I could go from airbrush to brush without changing the paint itself. Now HF does leave a gloss finish. This may be what you want on some builds and not others. I got some ultra Matt varnish from AK but decided not to use it on this build.
After looking at it, I liked the finish. I have read that you can varnish in gloss for better protection and then in matte to get rid of the gloss. I plan on trying that in the future. I reached out to Golden and let them know I was painting statues, and they gave me some Adie on paints I should try. They have some Fluid Acrylics and an airbrush medium with simple instructions on dilution. I will be getting more of their paints in the future and trying them out.
For me, the longest part of the painting process is the waiting. Some people speed this up by using a hair dryer or heat gun, and although I have tried this, I think I prefer just waiting for things to cure out. I don’t have multiple projects running, so this is one thing that I need to work on. I can be impatient sometimes because I hate waiting. I also try to stream live when I am painting, links here, and that can make for either short streams or streams where I am just waiting. I need to work on my workflow a bit.
Final Assembly
This project was in pieces, and I decided to paint the pieces individually and assemble them at the end. I did have some issues getting pieces to stick. I am not sure if it was the super glue I was working with, the paint on the parts, or a mix of that or something else. Parts would stick but easily break. Ricks’s head was particularly heavy and was prone to slipping and snapping the glue. In the end, I got it all to stay, and after curing overnight, it was fine.
I have a two-part epoxy, but it takes a while to set, and I did not think I could hold all the parts together long enough without wasting the rest of the mix. Epoxy is not something you can mix and not use at all. By the time the one part you are holding sets, the rest of the epoxy is not useable. I am still new to this hobby and still learning. If you have any tips or tricks, please leave a comment here. I plan on making a YT video on this, and I will link it here when it’s live. Till then, thanks for reading, and I will see you on the next build.